It’s 2014, and there’s no way around it. You need to learn how to use Git and GitHub.
 Git is a distributed revision control and source code management (SCM) system with an emphasis on speed, data integrity, and support for distributed, non-linear workflows.Git was initially designed and developed by Linus Torvalds for Linux kernel development, and has since become the most widely adopted version control system for software development.
 GitHub is more than just a programmer’s tool. If you want to collaborate on anything, you should give it a try. Why? Because it’s a social network that has completely changed the way of working. Having started as a developer’s collaborative platform, GitHub is now the largest online storage space of collaborative works that exists in the world.
As embarrassing as it is to admit, this tutorial came into being because all of the “GitHub for Beginners” articles I read were way over my head. That’s probably because I don’t have a strong programming background.
If you’ve given up on understanding how to use GitHub, this article is for you 😉
GitHub itself isn’t much more than a social network like Facebook or Twitter. You build a profile, upload projects to share and connect with other users by “following” their accounts. And while many users store programs and code projects, there’s nothing preventing you from keeping text documents or other file types in your project folders to show off.
You may already have a dozen other social media accounts, but here’s why you should be on GitHub anyway: it’s got the best Terms of Service agreement out of the bunch.
“We claim no intellectual property rights over the material you provide to the Service. Your profile and materials uploaded remain yours.”

What’s more? You can actually use GitHub without knowing ANY CODE at all. You don’t really need a tutorial to sign up and click around. But I do think that there’s merit to learning things the hard way first, by which I mean, with plain old coding in Git. After all, GitHub just happens to be one of the most effortless graphical interfaces for the Git programming language.
What is Git?
Thanks to the famed software developer Linus Torvalds for Git, the software that runs at the heart of GitHub. (And while you’re at it, go ahead thank him for the Linux operating system, too.) Git is version control software, which means it manages changes to a project without overwriting any part of that project. And it’s not going away anytime soon, particularly since Torvalds and his fellow kernel developers employ Git to help develop the core kernel for Linux.
Why use something like Git? Say you and a coworker are both updating pages on the same website. You make your changes, save them, and upload them back to the website. So far, so good. The problem comes when your coworker is working on the same page as you at the same time. One of you is about to have your work overwritten and erased.
A version control application like Git keeps that from happening. You and your coworker can each upload your revisions to the same page, and Git will save two copies. Later, you can merge your changes together without losing any work along the way. You can even revert to an earlier version at any time, because Git keeps a “snapshot” of every change ever made.
The problem with Git is that it’s so ancient that we have to use the command line or Terminal. This can be a difficult proposition for modern computer users. That’s where GitHub comes in.
GitHub makes Git easier to use in two ways. First, if you download the GitHub software to your computer, it provides a visual interface to help you manage your version-controlled projects locally. Second, creating an account on GitHub.com brings your version-controlled projects to the Web, and ties in social network features for good measure.
You can browse other GitHub users’ projects, and even download copies for yourself to alter and learn from. Other users can do the same with your public projects, and even spot errors and suggest fixes. Either way, no data is lost because Git saves a “snapshot” of every change.
While it’s possible to use GitHub without learning Git, there’s a big difference between using and understanding. Before I figured out Git I could use GitHub, but I didn’t really understand why. In this tutorial, we’re going to learn to use Git on the command line.
Words People Use When They Talk About Git
In this tutorial, there are a few words I’m going to use repeatedly, none of which I’d heard before I started learning. Here’s the big ones:
Command Line: The computer program we use to input Git commands. On Linux or Mac, it’s called Terminal.
Version Control: Basically, the purpose Git was designed to serve. When you have a Microsoft Word file, you either overwrite every saved file with a new save, or you save multiple versions. With Git, you don’t have to. It keeps “snapshots” of every point in time in the project’s history, so you can never lose or overwrite it.
Repository: A directory or storage space where your projects can live. Sometimes GitHub users shorten this to “repo.” It can be local to a folder on your computer, or it can be a storage space on GitHub or another online host. You can keep code files, text files, image files, you name it, inside a repository.
Branch: How do multiple people work on a project at the same time without Git getting them confused? Usually, they “branch off” of the main project with their own versions full of changes they themselves have made. After they’re done, it’s time to “merge” that branch back with the “master,” the main directory of the project.
Commit: This is the command that gives Git its power. When you commit, you are taking a “snapshot” of your repository at that point in time, giving you a checkpoint to which you can re-evaluate or restore your project to any previous state.
Git-Specific Commands
Since Git was designed with a big project like Linux in mind, there are a lot of Git commands. However, to use the basics of Git, you’ll only need to know a few terms. They all begin the same way, with the word “git”
git init: Initializes a new Git repository inside the directory from where you gave the command. Until you run this command inside a repository or directory, it’s just a regular folder. Only after you input this does it accept further Git commands.
git config: Short for “configure,” this is most useful when you’re setting up Git for the first time.
git help: Forgot a command? Type this into the command line to bring up the 21 most common git commands. You can also be more specific and type “git help init” or another term to figure out how to use and configure a specific git command.
git status: Check the status of your repository. See which files are inside it, which changes still need to be committed, and which branch of the repository you’re currently working on,like that.
git add: This does not add new files to your repository. Instead, it brings new files to Git’s attention. After you add files, they’re included in Git’s “snapshots” of the repository.
git commit: Git’s most important command. After you make any sort of change, you input this in order to take a “snapshot” of the repository. Usually it goes git commit -m “Your commit message here.” The -m indicates that the following section of the command should be read as a message.
git branch: Working with multiple collaborators and want to make changes on your own? This command will let you build a new branch, or timeline of commits, of changes and file additions that are completely your own. Your title goes after the command. If you wanted a new branch called “cats,” you’d type git branch cats.
git checkout: Literally allows you to “check out” a repository that you are not currently inside. This is a navigational command that lets you move to the repository you want to check. You can use this command as git checkout master to look at the master branch, or git checkout cats to look at cats branch.
git merge: When you’re done working on a branch, you can merge your changes back to the master branch, which is visible to all collaborators. git merge cats would take all the changes you made to the “cats” branch and add them to the master branch.
git push: If you’re working on your local computer, and want your commits to be visible online on GitHub as well, you “push” the changes up to GitHub with this command.
git pull: If you’re working on your local computer and want the most up-to-date version of your repository to work with, you “pull” the changes down from GitHub with this command.
Setting Up Git And GitHub For The First Time
First, you’ll need to sign up for an account on GitHub.com. It’s as simple as signing up for any other social network. Keep the email you picked handy; we’ll be referencing it again soon.
After signing up, you could stop there and GitHub would work fine. But if you want to work on your project on your local computer, you need to have Git installed. In fact, GitHub won’t work on your local computer if you don’t install Git. Install Git for Linux, Windows or Mac as needed.
Now it’s time to go over to the terminal.It’s time to introduce yourself to Git. Type in the following code:
git config --global user.name "Your Name Here"
Of course, you’ll need to replace “Your Name Here” with your own name in quotations. It can be your legal name, your online handle, anything. Git doesn’t care, it just needs to know to whom to credit commits and future projects.
Next, tell it your email and make sure it’s the same email you used when you signed up for a GitHub.com account just a moment ago. Do it like this:
git config --global user.email "your_email@youremail.com"
That’s all you need to do to get started using Git on your computer.
Creating Your Online Repository
Now that you’re all set up, it’s time to create a place for your project to live. Both Git and GitHub refer to this as a repository, or “repo” for short, a digital directory or storage space where you can access your project, its files, and all the versions of its files that Git saves.
Go back to GitHub.com and click the tiny book icon next to your username. Or, go to the new repository page if all the icons look the same. Give your repository a short, memorable name. Go ahead and make it public just for kicks; why hide your attempt to learn GitHub?
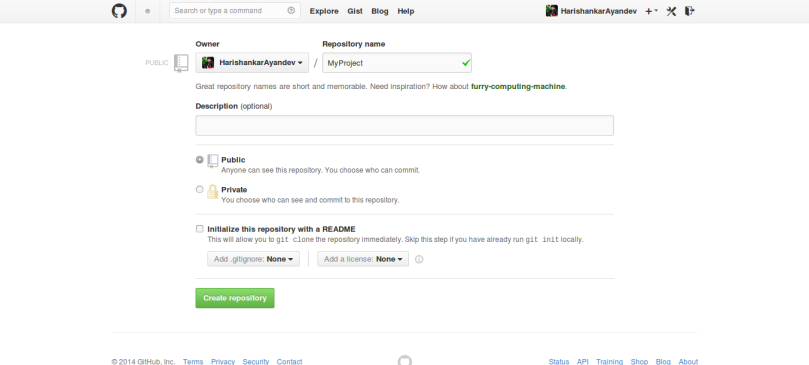
Don’t worry about clicking the checkbox next to “Initialize this repository with a README.” A Readme file is usually a text file that explains a bit about the project. But we can make our own Readme file locally for practice.
Click the green “Create Repository” button and you’re set. Tada 😉 . You now have an online space for your project to live in.
Creating Your Local Repository
So we just made a space for your project to live online, but that’s not where you’ll be working on it. The bulk of your work is going to be done on your computer. So we need to actually mirror that repository we just made as a local directory.
This(where we do some heavy command line typing) is the part of every Git tutorial that really trips me up, so I’m going to go tediously.
First, type:
mkdir ~/MyProject
mkdir is short for make directory. It’s not actually a Git command, but a general navigational command from the time before visual computer interfaces. The ~/ ensures that we’re building the repository at the top level of your computer’s file structure, instead of stuck inside some other directory that would be hard to find later. For me, using Linux, it displays my home folder.
Also, notice that I called it MyProject, the very same name I called my GitHub repository that we made earlier. Keep your name consistent, too.
Next, type:
cd ~/MyProject
cd stands for change directory, and it’s also a navigational command. We just made a directory, and now we want to switch over to that directory and go inside it. Once we type this command, we are transported inside MyProject.
Now we’re finally using a Git command. For your next line, type:
git init
You know you’re using a Git command because it always begins with git init stands for “initialize.” Remember how the previous two commands we typed were general command-line terms? When we type this code in, it tells the computer to recognize this directory as a local Git repository. If you open up the folder, it won’t look any different, because this new Git directory is a hidden file inside the dedicated repository.
However, your computer now realizes this directory is Git-ready, and you can start inputting Git commands. Now you’ve got both an online and a local repo for your project to live inside.
Now that these steps have been accomplished, let’s add the first part of your project now by making your first commit to GitHub.
In your terminal, type:
touch Readme.txt
This, again, is not a Git command. It’s another standard navigational command prompt. touch really means “create.” Whatever you write after that is the name of the thing created. If you go to your folder , you’ll see an empty Readme.txt file is now inside.
You can clearly see your new Readme file. But can Git? Let’s find out. Type:
git status
The command line, usually so passive up to this point, will reply with a few lines of text similar to this:
# On branch master
# Untracked files:
#   (use "git add ..." to include in what will be committed)
#
#         Readme.txt
What’s going on? First of all, you’re on the master branch of your project, which makes sense since we haven’t “branched off” of it. There’s no reason to, since we’re working alone. Secondly, Readme.txt is listed as an “untracked” file, which means Git is ignoring it for now. To make Git notice that the file is there, type:
git add Readme.txt
Notice how the command line gave you a hint there? All right, we’ve added our first file, so it’s time to take a “snapshot” of the project so far, or “commit” it:
git commit -m “Added the file Readme.txt”
The -m flag, simply indicates that the following text should be read as a message.
Now that we’ve done a little work locally, it’s time to “push” our first commit up to GitHub.
“Wait, we never connected my online repository to my local repository,” you might be thinking. And you’re right. In fact, your local repository and your online one are only connecting for short bursts, when you’re confirming project additions and changes. Let’s move on to making your first real connection now.
Connect Your Local Repository To Your GitHub Repository
Having a local repository as well as a remote (online) repository is the best of both worlds. You can tinker all you like without even being connected to the Internet, and at the same time showcase your finished work on GitHub for all to see.
This setup also makes it easy to have multiple collaborators working on the same project. Each of you can work alone on your own computers, but upload or “push” your changes up to the GitHub repository when they’re ready. So let’s get cracking.
First, we need to tell Git that a remote repository actually exists somewhere online. We do this by adding it to Git’s knowledge. Just like Git didn’t acknowledge our files until we used the git add command, it won’t acknowledge our remote repo yet, either.
Assume that we have a GitHub repo called “MyProject” located at https://github.com/username/myproject.git. Of course, username should be replaced with whatever your GitHub username actually is, and myproject should be replaced with the actual title you named your first GitHub repository.
git remote add origin https://github.com/username/myproject.git
The first part is familiar; we’ve used git add already with files. We’ve tacked the word origin onto it to indicate a new place from which files will originate. remote is a descriptor of origin, to indicate the origin is not on the computer, but somewhere online.
Git now knows there’s a remote repository and it’s where you want your local repository changes to go. To confirm, type this to check:
git remote -v
This command gives you a list of all the remote origins your local repository knows about. Assuming you’ve been with me so far, there should only be one, the myproject.git one we just added. It’s listed twice, which means it is available to push information to, and to fetch information from.
Now we want to upload, or “push,” our changes up to the GitHub remote repo. That’s easy. Just type:
git push
The command line will chug through several lines on its own, and the final word it spits out will most likely be “everything up-to-date.”
Git’s giving me a bunch of warnings here since I just did the simple command. If I wanted to be more specific, I could have typed git push origin master, to specify that I meant the master branch of my repository. I didn’t do that because I only have one branch right now.
Log into GitHub again. You’ll notice that GitHub is now tracking how many commits you’ve made today. If you’ve just been following this tutorial, that should be exactly one. Click on your repository, and it will have an identical Readme.txt file as we earlier built into your local repository.
All Together Now!
Congratulations, you are officially a Git user now! You can create repos and commit changes with the best of them. This is where most beginner tutorials stop.
However, you may have this nagging feeling that you still don’t feel like an expert. Sure you managed to follow through a few steps, but are you ready to be out on your own? I certainly didn’t :p .
In order to get more comfortable with Git, let’s walk through a fictional workflow while using a little of everything we’ve already learned. You are now a worker at 123 Web Design, where you’re building a new website for Richard Castle’s men’s beauty parlour along with a few of your coworkers.
You were a little nervous when your boss told you that you’d be participating in the Richard Castle’s men’s beauty parlour webpage redesign project. After all, you’re not a programmer; you’re a graphic designer. But your boss assured you that anyone can use Git.
You’ve created a new illustrations of facial, and it’s time to add it to the project. You’ve saved them in a folder on your computer that is also called “parlour” to prevent yourself from getting confused.
Open up the Command Line and change directory until you’re inside the parlour folder, where your designs are stored.
cd ~/parlour
Next, initialize Git so you can start using Git commands inside the folder. The folder is now a Git repository.
git init
Wait, this is the right folder, right? Here’s how you check and make sure this is where you stored your design:
git status
And this is what Git will tell you in reply:
# Untracked files:
#   (use "git add ..." to include in what will be committed)
#
#       sandal facial.jpeg
There they are! Add them to your local Git repository so they’ll be tracked by Git.
git add sandal facial.jpeg
Now, take a “snapshot” of the repository as it stands now with the commit command:
git commit -m “Added sandal facial.jpeg.”
Great! But your co-workers, hard at work in their own local repositories, can’t see your fantastic new design. That’s because the main project is stored in the company GitHub account (username: 123WebDesign) in the repository called “parlour”
Since you haven’t connected to the GitHub repo yet, your computer doesn’t even know this exists. So tell your local repository about it:
git remote add origin https://github.com/123WebDesign/parlour.git
And double check to make sure it knows:
git remote -v
Finally, it’s the moment you’ve been waiting for. Upload that facial style up to the project:
git push
Ta da! With all of these tool at hand, it’s clear that Git and the GitHub service aren’t just for programmers.
Some useful Resources
Git is dense, I know. I did my best to make a tutorial that could even teach me how to use it, but we don’t all learn in the same ways. Here are some resources I found useful while teaching myself how to use Git and GitHub over the summer:
- Pro Git. Here’s an entire open source book on learning and using Git. It looks like a long one, but I didn’t need to read anything past chapter three just to learn the basics.
- Git Reference. Got the basics down but find yourself always forgetting the commands? This handy site is great as a glossary reference
- Git – the simple guide. This tutorial is short and sweet, but it was a little too fast for me as a beginner. If you want to refresh on the basics of Git, this should be all you need.
