Frequently Used Commands of git

Hola!

It’s been a longtime.

There are several git commands which I find hard to remember. I hate each and every time I depend on google for this. Hence I thought I’ll make a cheat sheet for me which will also help some Tom, Dick and Harry who are suffering from the same problem.


git add

Add Tracked Files Only

$ git add -u


git checkout

Checkout A Remote Branch

$ git fetch
$ git checkout <branch_name>

Discard Unstaged Changes

$ git clean -df
$ git checkout -- .

Note: git clean removes all untracked files and git checkout clears all unstaged changes.


git commit

Change Author After Commit

$ git commit --amend --author="Harishankar Ayandev <harishankards@gmail.com>"


git config

Prevent GitHub git bash/zsh from Asking for Password

Change remote to be SSH instead of HTTPS.

$ git config remote.origin.url git@github.com:<the_repository_username>/<your_project>.git

Colorful UI

$ git config --global color.ui auto

Alias

$ git config --global alias.ck checkout

Note: So that I can use git ck instead of git checkout later. You can use this command to change whatever git command you want.

Setup email and name

$ git config --global user.email <your_email>
$ git config --global user.name <your_name>

git diff

View Changes After Commit

Before committing, changes can be viewed by git diff. But if you forget to check it before committing, this is what you can do.

$ git log  # to get the last two commit hashes
$ git diff <old-commit-hash> <new-commit-hash>

git log

View Remote Commit Log

$ git log <remote_name>/<branch_name>

E.g. : git log origin/master


git push

Delete A Remote Branch

$ git push origin --delete <branch_name>

Push To A New Remote Branch

$ git push origin <local_branch_name>:<remote_branch_name>

git show

View Files of Last Commit

$ git show REVISION:<path/to/file>

Or, redirect it to a file.

$ git show REVISION:<path/to/file> > <file_name>
 

git update

Ignore tracked local file

git update-index --assume-unchanged <file>

Corresponding undo operation is as follows.

git update-index --no-assume-unchanged <file>

Well, these are the commands that I’ll be using most of the time. If you need anymore commands to be added in the cheat sheet, kindly comment so that I can add that too. See ya 🙂


Creating a gluey menu using CSS

HTML part :


//

CSS part:

body {
  background: #ecf0f1;
  color: #444;
  font-family: Helvetica, sans-serif;
  background: #efefef;
}

.bubbles {
  display: inline-block;
  -webkit-filter: url("#goo");
          filter: url("#goo");
  position: absolute;
  left: 50%;
  top: 50%;
  margin-left: -50px;
  margin-top: -50px;
  width: 380px;
  height: 0;
}
.bubbles a {
  text-decoration: none;
  color: #444;
  position: absolute;
  outline: none;
}
.bubbles a:nth-child(1) {
  -webkit-transform: translate(0px, 0px);
      -ms-transform: translate(0px, 0px);
          transform: translate(0px, 0px);
}
.bubbles a:nth-child(2) {
  -webkit-transform: translate(100px, 0px);
      -ms-transform: translate(100px, 0px);
          transform: translate(100px, 0px);
}
.bubbles a:nth-child(3) {
  -webkit-transform: translate(-100px, 0px);
      -ms-transform: translate(-100px, 0px);
          transform: translate(-100px, 0px);
}
.bubbles a:nth-child(4) {
  -webkit-transform: translate(0px, -100px);
      -ms-transform: translate(0px, -100px);
          transform: translate(0px, -100px);
}
.bubbles a:nth-child(5) {
  -webkit-transform: translate(0px, 100px);
      -ms-transform: translate(0px, 100px);
          transform: translate(0px, 100px);
}
.bubbles a .bubble {
  border-radius: 50%;
  background: #DA5F7B;
  font-size: 2em;
  height: 100px;
  line-height: 100px;
  text-align: center;
  width: 100px;
  -webkit-transition: 0.3s;
          transition: 0.3s;
}
.bubbles a .bubble:hover {
  height: 120px;
  width: 120px;
  line-height: 120px;
  cursor: pointer;
  margin: -10px;
}
.bubbles a .bubble:active {
  height: 120px;
  width: 120px;
  line-height: 120px;
  cursor: pointer;
  margin: -10px;
  background: #DA5F7B;
}

For demo : http://codepen.io/harishankards/pen/JdXpXm

How to speed up slow WiFi connection in Ubuntu?

One of the most common problem faced after installing Ubuntu is network problem. Some times you will have no wireless network in Ubuntu and some times very slow wireless connection and some time it will fluctuate between fast and slow. If you are lucky, it could be fixed by installing propriety drivers in Ubuntu but generally you will be left fuming, cursing over slow or no WiFi connection.

In this post I’ll only focus to fix slow WiFi problem in Ubuntu , Linux Mint and other similar OS. This actually consists of several small tricks that you can try to get faster WiFi. So lets see how to fix slow WiFi in Ubuntu:

Solution 1: For Slow WiFi in Atheros Wireless Network Adaptors

First you need to find your wirless network adaptor. You can do so by using lshw -C network command in terminal. If your adaptor manufacturer is Atheros, this solution should work for you.

Open a terminal (Ctrl+Alt+T in Ubuntu) and use the following commands one by one:

sudo su
 echo "options ath9k nohwcrypt=1" >> /etc/modprobe.d/ath9k.conf

This will add the additional line to configuration file. Restart your computer and you should be good to go. If it does not fix or if you don’t have Atheros WiFi adaptor, try other solutions.

Solution 2: Disable 802.11n

The next trick is to force disable the 802.11n protocol. Even after so many years, most of the world runs 802.11a,b and g. While 802.11n provides better data rate, not all the routers support it, especially the older ones. It has been observed that disabling the 802.11 n helps speed up the wireless connection in Ubuntu and other OS.

Open the terminal and use the following command:

sudo rmmod iwlwif
 sudo modprobe iwlwifi 11n_disable=1

If you find no significance increase in the wireless connection speed, restart the computer to revert the changes and forget about this solution. BUT if it worked for you and you have a faster WiFi now, you should make the changes permanent by using these commands:

sudo su
 echo "options iwlwifi 11n_disable=1" >> /etc/modprobe.d/iwlwifi.conf

Restart your computer and live your life at full speed.

Important note:

If you are using version older than Ubuntu 12.04, use the previous steps with iwlwifi replaced by iwlagn.

Solution 3: Fix the bug in Debian Avahi-daemon

The slow WiFi in Ubuntu problem could also be related to a bug in Avahi-daemon of Debian. Ubuntu and many other Linux distribution are based on Ubuntu so this bug propagates to several Linux distributions. To fix this bug, you have to edit the nsswitch configuration file. Open a terminal and use the following command:

sudo gedit /etc/nsswitch.conf

This will open the configuration file in gedit so that you could edit it easily in GUI. In here, look for the following line:

hosts:          files mdns4_minimal [NOTFOUND=return] dns mdns4

If you find this file, replace it with the following line:

hosts:          files dns

Save it, close it, restart your computer. It should fix the slow wireless connection problem for you. If it doesn’t check the other solution.

Solution 4: Disable IPv6 support

Yes, you heard it right. Lets go back to the previous century and care about IPv4 only by ditching IPv6 support. It is perfectly fine because IPv6 is still in deployment mode and a significant number of ISPs don’t even support it. Moreover, if it improves the WiFi speed, why not, I say. To disable IPv6 support, use the following commands one by one:

sudo su
 echo "#disable ipv6" >> /etc/sysctl.conf
 echo "net.ipv6.conf.all.disable_ipv6 = 1" >> /etc/sysctl.conf
 echo "net.ipv6.conf.default.disable_ipv6 = 1" >> /etc/sysctl.conf
 echo "net.ipv6.conf.lo.disable_ipv6 = 1" >> /etc/sysctl.conf

Restart your computer and it should do the magic. If not try the next one.

Solution 5: Ditch default network manager and embrace Wicd

Slow or inconsistent wireless connection, in some cases, are also due to Ubuntu’s very own default network manager. I am not sure what causes this but I have seen people in Ubuntu Forums talking about this problem in especially in Ubuntu 12.04. You can install Wicd, an alternate and a better network manager from Ubuntu Software Centre or from terminal. For details on how to use Wicd, you can read my other article which I used to find SSID of wireless networks in Ubuntu.

Solution 6: More power to wireless adaptor

This trick could be obsolete and this is why I mentioned it in the end. At the time of Ubuntu 11.04, Linux Kernel had a power management system. This troubled some users with their wireless connection speed as it sent less power to wireless adaptor and thus affecting its performance. As a result wireless connection would be some times fast and some times dead slow. While this is probably fixed in later Kernels, systems running older Linux Kernel may still face it.

Open a terminal and use the following command:

sudo iwconfig

It will give you the name of your wireless device. Normally it should be wlan0. Now use the following command:

sudo iwconfig wlan0 power off

This will switch off the special power management system for the wireless adaptor and thus it will get more power and will work more (lame attempt at even lamer humour).

Did it work for you?

Okay, six ways to fix slow WiFi in Ubuntu. You should find “the one” for you. Anyways, do let me know if it worked for you and if it worked, which solution was it. Also, if you come across a newer solution, please share it with me so that all of us could be benefited from your experience. Feel free to drop your suggestion, thanks or even to point out spelling or grammatical mistakes. And if the article helped you to speed up WiFi in Ubuntu, you might want to read how to speed up Ubuntu overall.

How to install Git on a GoDaddy shared hosting server?

I have a Linux shared hosting account with GoDaddy, which I use to host sites for a selection of my customers. A few months back I decided I needed to get up to speed and use version control to manage these sites. Working on the sites locally and pushing any amended files up to my server using FTP was not a great workflow. So, I decided Git was the way forward.

After hours of research into the possibilities of installing Git on my GoDaddy shared hosting server, I eventually pieced together a way to achieve this set-up. Below is my breakdown of how it’s done.

Note: You will need to have basic knowledge of Git and the command line in order to be able to follow this article.

Install Git on your GoDaddy shared hosting server

Your server does not come with git pre-installed. Therefore you need to SSH to your server and download/unpack Git. You can set-up your SSH access by following these instructions provided by GoDaddy.

1. Open your chosen command line editor (I recommend Terminal for Linux and Mac or Putty for Windows) and login to your hosting account:

$ ssh yourusername@yourserver
$ yourpassword

Note: To prevent having to enter your password every time you SSH to your server, set-up SSH key authentication. For anyone unsure how SSH keys work, GoDaddy explain this pretty well:

The public and private key are similar to a puzzle. They are created together to use during the login/authentication process. The public key resides on the server (the remote location) The private key resides locally on your computer/server. When you attempt to login to a server, the public and private key are compared. If they “match”, then you will be allowed to login to the server location.

2. Download the GIT binaries:

$ wget http://adamboother.com/assets/downloads/git-1.7.3.4_centos5.2.tar.bz2

These binaries have been compiled from Git (version 1.7.3.4) on a Linux machine running CentOS 5.2, which is the same operating system that my GoDaddy server runs. Linux binaries are usually portable so these might also work on other servers running a different operating system. If they don’t work, you can compile them yourself using a virtual machine with the same operating system specifications as your hosting account.

2: Unpack the downloaded Git binaries:

$ tar -xvjf git-1.7.3.4_centos5.2.tar.bz2

Set up the Git repository

So now Git is installed on your server, you can go ahead and create a Git repository. Let’s say we’re going to create this repository in the home directory:

1. Go to the home directory:

$ cd ~/public_html

1. Initialise your Git repository:

$ git init

3. Change the permissions to protect your git repository, as it will be visible on the web:

$ chmod 770 -R .git

4. Accept pushes from your local repository:

$ git config receive.denyCurrentBranch ignore

5. Go to the ‘hooks’ directory then edit the ‘post-receive’ file:

$ cd .git/hooks
$ nano post-receive

Add the following into top of file:

GIT_WORK_TREE=../ git checkout -f

Save these changes to the file and exit it.

6. Change the permissions for this file:

$ chmod +x post-receive

That’s your Git repository set-up and all the necessary housekeeping done.

Clone your Git repository to your machine

Git is now installed on your server and you’ve set-up the repository for your site. You now need to clone this repository to your machine. To keep this tutorial simple, we’re going to clone this repository onto the desktop.

1. Open a new tab in your command line editor, then go to the desktop directory:

$ cd ~/Desktop

2. Clone your live respository:

$ git clone yourusername@yourserver:public_html

3. Add your site files to your local folder, then commit/push them up to the server:

$ git add -A
$ git commit "Your commit message here"
$ git push origin master

Your local files are now up on your server and you’re good to go. Any amendments to your site from now on will be tracked and can be pushed up to your GoDaddy shared hosting server using Git.

Flying start with Guake – a dropdown terminal

Install Guake

The first step is to install guake. Its available in the repositories, so install it right away.

$ sudo apt-get install guake

Fix error – “Guake can not init!”

After installation, try launching Guake from the Application Menu. It should be in the System category. On Xubuntu, Guake might fail to launch with the following error message

Guake can not init!

Gconf Error.
Have you installed guake.schemas properly?

The above error occurs, because the guake.schemas file is not found in the correct location. To fix this error, simply run the following commands

$ sudo mkdir /etc/gconf/schemas
$ cd /etc/gconf/schemas/
$ sudo ln -s /usr/share/gconf/schemas/guake.schemas

Now try launching Guake again and it should work.

Configure Guake to startup at logon

On Xubuntu guake is not configured to startup at logon automatically. This has to be done manually, but is not difficult.

Go to All Settings > Session and Startup. Go to “Application Autostart” tab and click Add. Fill in the following details

Name - Guake
Description - Guake dropdown terminal
Command - /usr/bin/guake

Click OK and close it. Next time when you boot, Guake terminal should load right after logging in to the desktop.

You can also run the following command to configure guake to autostart at logon.

$ cp /usr/share/applications/guake.desktop /etc/xdg/autostart/

How to fix “Failed To Start Session” at login in Ubuntu?

I was trying to log in to Ubuntu as usual. I entered my password and it did not log me in even with the correct password. Instead it showed me failed to start session in red colors. I could not even log in to guest session.

In this quick post, we shall see how to fix failed to start session issue in Ubuntu.

Fix failed to start session in Ubuntu

The reason here is that somehow your Unity desktop has been messed up. You can try several way to recover it. Let’s see how to do it.

When you are at login, press Ctrl+Alt+F1. It will take you to command line interface from the GUI. In here, type your username and password. Now, you can try the following command to install Unity Desktop:

sudo apt-get install ubuntu-desktop

If it is already installed, try reinstalling:

sudo apt-get install --reinstall ubuntu-desktop

Once it is installed or reinstalled. Use the following command to reboot the system:

sudo reboot

It will reboot and bring you back to login screen. Try login now. You should be able to log in. If you are still unlucky, try to use the alternative below:

Alternative method:

As an alternative you can use the command below to reconfigure the packaging:

sudo dpkg-reconfigure -a

At times, this should fix the failed to start session issue in Ubuntu. But it was not that easy for me. I used another approach which is slightly dirty. When I saw that reinstalling Unity and reconfiguring the packages dis not make any difference, I installed Gnome instead using a command like this:

sudo apt-get install gnome-shell ubuntu-gnome-desktop

This time at reboot, I was able to boot in to Gnome desktop or even choose to boot in to Ubuntu default i.e. Unity. A word of warning, Unity may seem broken after installing Gnome. Change the theme and icons to that of Ambiance, instead of default (Adawita).

That helped me fix “failed to load session” error in Ubuntu. Did it work for you? Do let me know if you have questions or suggestions.

How to install Ubuntu in dual boot mode with Windows 8 or 8.1?

Nowadays, the newer systems that come with Windows 8 or Windows 8.1, have UEFI instead of BIOS. This makes thing a little different from the conventional way of dual booting. Here, we shall see how to install Ubuntu, a GNU/Linux operating system  in dual boot mode with Windows 8 or Windows 8.1.

I will cover all the steps you need to do in order to successfully dual boot Linux with Windows 8 UEFI. If you have already done some of these steps, just skip to the next one.

Note:  The steps mentioned here are applicable to other Debian based Linux distributions such as Linux Mint, Crunchbang, Elementary OS etc. Cutting the chit-chat, let’s see how to dual boot Linux on a UEFI secure boot enabled Windows 8 system.

Dual boot Ubuntu 14.04 with Windows 8:

There are various prerequisites to install Ubuntu on a UEFI system. Let’s see them one by one:

Step 1: Make a backup [optional]

It is always nice to make a back up, just in case if you mess up with the system. There are numerous articles on the web to show you how to backup your system. You can follow this tutorial here.

Step 2: Create a live USB/disk of Ubuntu

The next thing you need to do is to create a live USB or disk. I recommend Rufus software to create a live USB of Linux OS in Windows.

Step 3: Make a partition where Ubuntu will be installed

Assuming tat you have a fresh system, the first thing we need to do is to make partition to install Linux. The 256 GB in my system was already had several partitions from manufacturer but mainly for backup and other purposes. Main partition was C drive, of around 220 GB, where Windows 8.1 was installed.

If you have just one partition like this, you need to make some free space out of it for Linux. If you have several partitions of considerable size, use any of them except C drive because it may erase the data.

To make a partition in Windows 8, go to Disk Management tool. You can find disk management tool by searching for ‘disk’ in Control Panel.
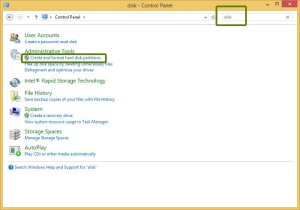
disk partition

In the Disk Management tool, right click on the drive which you want to partition and select shrink volume. In my case, I shrank the C drive to make some free space:
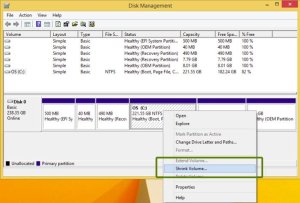
disk_partition_Windows8

You can leave the free space as it is. We shall use it while installing Ubuntu.

Step 4: Disable fast startup in Windows [optional]

Windows 8 introduced a new feature called “fast startup” for quick boot. While it is not mandatory, it would be better to have it disabled.

Go to Control Panel > Hardware and Sound > Power Options > System Settings > Choose what the power buttons do and uncheck the Turn on fast startup box.

If you need more hints, follow this screenshot tutorial to disable fast startup in Windows 8.

Step 5: Disable secureboot in Windows 8 and 8.1

This is the most important step. The new secure boot feature of Windows 8, originally intended for security feature for rootkit viruses, prevents dual booting of Windows with Linux. To dual boot Windows 8 with Linux, we must disable secure boot in UEFI.

Now reboot your system. By this time you must have been booted in to UEFI utility. You can change various settings here but all we want to do right now is to disable secure boot option to allow dual booting of Ubuntu or any other Linux

Move to Boot tab, there you’ll find Secure Boot option which is set to enabled. Use the arrow key to go to Secure Boot option and then press enter to select it. Use + or – to change its value. Confirm it when prompted. Press F10 to save the changes and exit the UEFI settings.
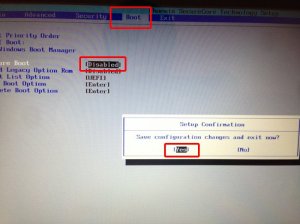
Disable_Secure_Boot_Windows8

Step 6: Installing Ubuntu alongside Windows 8

Once you have disabled secure boot, it’s time to install Ubuntu. I hope you already created the live USB as mentioned in step 2. Plug in the USB and boot the system from it.

To boot from USB, you will have to choose boot from USB option from within Windows itself. Either with PC Setting (like for UEFI) or pressing shift key while clicking on Restart.

Once you have booted in the live USB, you will be presented with option to try or install Ubuntu. Click on install. You will be presented with few screen options to choose the language. It will then do some checks on available space, power and internet connection etc. Just click on Continue.
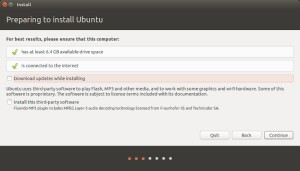
Installing_Windows8_Ubuntu

The main screen which you should pay attention to is Installation Type. Choose Something else here:
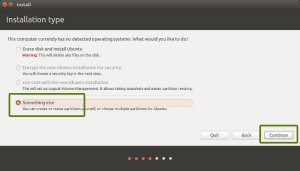
Installing_Windows8_Ubuntu_1

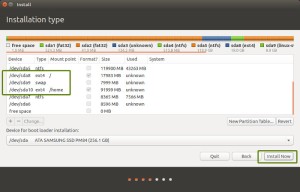
Remember we had created some free space beforehand? We shall use the free space to create Root, Swap and Home. Select the free space and click on the + sign.
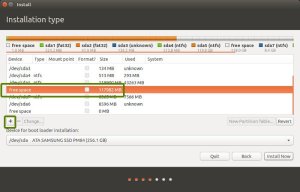
Installing_Windows8_Ubuntu_2

It will provide you with option to create Linux partition. We are creating the Root partition. Any thing between 10-20 GB is more than sufficient for it. Choose the size, select Ext 4 as file type and / (means root) as the mount point.
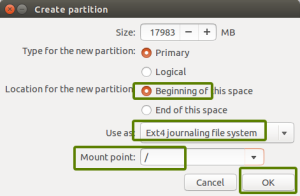
Installing_Windows8_Ubuntu_3

Clicking on OK in previous step will bring you to the partition screen. Next we will create swap. Like previously, click on the + sign again. This time use the file type as Swap area. Suggestible swap size is double of RAM.
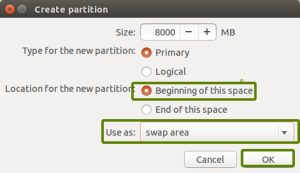
Installing_Windows8_Ubuntu_4

In similar fashion, create a Home partition. Allocate it maximum space (in fact allocate it rest of the free space) because this is where you’ll save music, pictures and downloaded files.
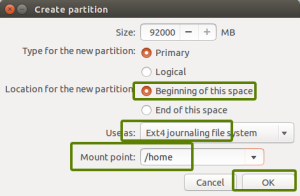
Installing_Windows8_Ubuntu_5

Once you are ready with Root, Swap and Home, click on Install Now:
Installing_Windows8_Ubuntu_6

Well, you have almost won the battle. You can taste victory now :p . Next you will be asked to set username password etc. Basically, you just need to click next now.

Once the installation is completed, restart the computer, you should be welcomed by a purple grub screen. Enjoy Ubuntu along with Windows 8 in dual boot mode.

I hope this guide helped you to dual boot Ubuntu with Windows 8 UEFI. Though this article is written for Ubuntu, it should be helpful for other Linux OS as well. 🙂

How to install ultrasurf in linux?

Ultrasurf has been one of the most used Proxy Bypass Server all the time. Installing it in Windows is perhaps the easiest job I found but when I tried to install it in Ubuntu, I literally had to scratch my head.

After a long search finally I found a solution which goes as this:

Step 1:
Install Wine in your system from the website http://www.winehq.org/ . Generally it comes pre installed but in case you don’t have it, then do it quickly.

Step 2:
Download the latest Ultrasurf file from the website http://ultrasurf.us/ . Unzip the downloaded file and you will get a .exe file.

Step 3:
Once you are done with step 1 and step 2, you just need to download two more file and you are done.
mfc42.dll  Click Here

-> msvcp60.dll  Click Here

Step 4:
Pretty much done. Now you just have to copy both the files at two places. Go to your Home folder and press Ctrl+H. This shows up the hidden files. Locate .wine. Inside the folder follow the path
drive_c/windows/system
drive_c/windows/system32
 Paste both the files in both the location. Now you are done.

Step 5:
Now open the .exe file with the help of wine. It takes a while for Ultrasurf to load in Ubuntu, so be patient. Once the software loads change the settings just as you do in Windows.

Tada 😉 All set to go..

How To Solve NTFS Mount Problem In Linux And Windows 8 Dual Boot?

Problem: The NTFS partition is in an unsafe state error in your GNU/Linux Operating System

Error mounting /dev/sda5 at /media/harishankarayandev/01BC76G7Z2628FB0: 
Command-line
`mount -t “ntfs” -o “uhelper=udisks2,nodev,nosuid,uid=1000,gid=1000,
dmask=0077,fmask=0177″ 
“/dev/sda5″ “/media/harishankarayandev/01BC76G7Z2628FB0″‘ 
exited with non-zero exit status
14: The disk contains an unclean file system (0, 0).
Metadata kept in Windows cache, refused to mount.
Failed to mount ‘/dev/sda5′: Operation not permitted
The NTFS partition is in an unsafe state. Please resume and shutdown
Windows fully (no hibernation or fast restarting), or mount the volume
read-only with the ‘ro’ mount option.

Reason: Fast Startup feature of Windows 8

Microsoft introduced a new feature in Windows 8 to reduce the boot time in otherwise “Slow Windows OS“. This feature is called Fast Startup. In normal shut down process power is removed form all components such as CPU, RAM, CD-Rom and hard disks. But in fast start up, Windows 8 saves some system information such as caching the registry etc to a file during shutdown. Part of the metadata about the state of all mounted partitions at the time of turn off is among these system information. This reduces the boot time of the Windows 8 and it creates the trouble for Linux based operating systems.

Since the information about the NTFS partition is stored in Windows 8, this prevents your Linux to mount them as mounting them in Linux will alter the metadata of the partitions. This is why it is in protected mode and you cannot mount it (without being root).

Solution: Disable Fast Startup in Windows 8

Temporary solution of this problem will be to boot in to Windows 8 and restart it. Restarting is different from shutdown and it should release the partition metadata from the stored system information. But this will only be a temporary solution because when you use Windows 8 next time, you’ll face the same problem again.

Permanent solution would be to disable the fast startup in Windows 8. This will increase your Windows 8 boot time so it is up to you if you prefer it. If you use Windows more frequently and you have probably set Window as default OS in dual boot with Linux, then you should avoid this solution. But if you more of a Linux guy and use Windows occasionally then you can disable fast startup in Windows 8 without thinking twice.

How to disable fast startup in Windows 8:

If you know how to go around Windows, use the following path to disable fast startup.

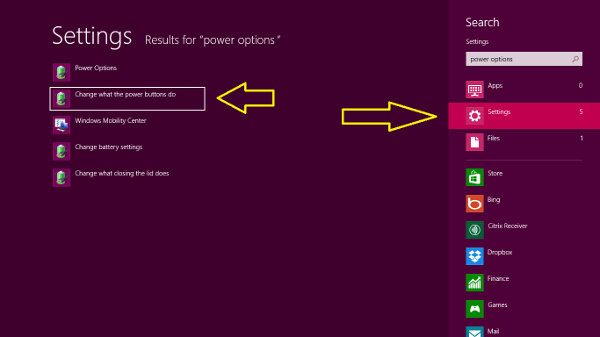
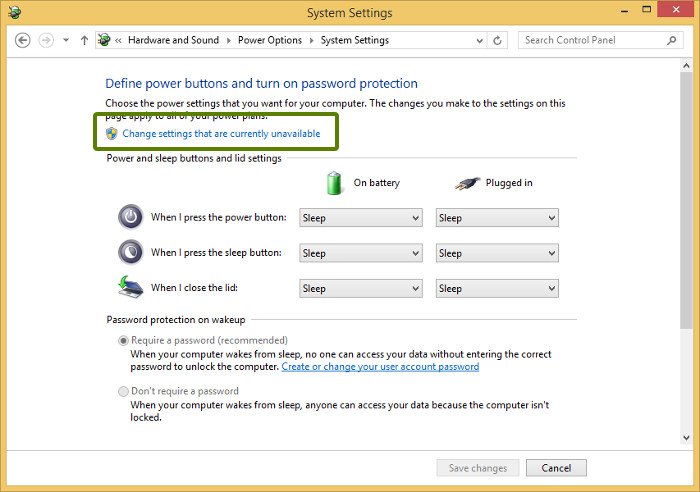
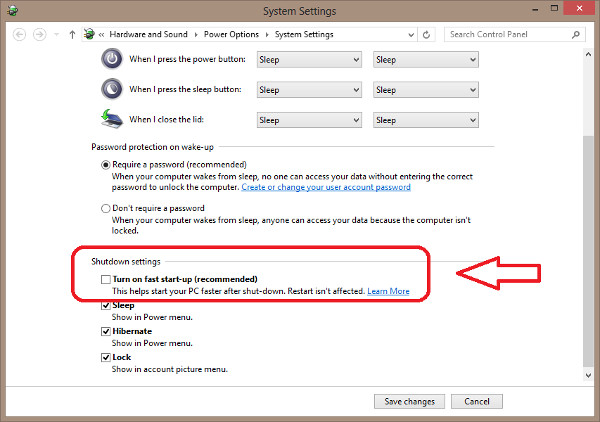
Go to Control Panel > Hardware and Sound > Power Options > System Setting > Choose what the power buttons do and uncheck the Turn on fast startup box.

Alternatively, here is the detailed process along with some picture to help you to disable fast startup in Windows 8. First search for Power Option along with Settings filter in start screen of Windows 8.

Power-Options-in-Windows-8

Make sure that you have admin rights:

disable_fast_startup_windows8

Scroll down a bit in power options to look for Turn on fast startup option and uncheck this box.

Power-Options-in-Windows-8-1

Tada 😉 That’s all. Next time you try to mount NTFS partition in Linux, you should not see the NTFS partition is in an unsafe state error.